
The Filters
In part 1 of this series, I spoke about getting the first steps in getting started with Neutral Density (ND) and Graduated Neutral Density Filters (ND Grads). I explained the difference between the circular threaded type of filter and slot in filters and the fact that if you were going to be using slot in filters, you’d need a filter holder and an adapter ring to fit your lens. In part 2, I’m going to assume you’ve opted for the slot in type (although the information will still be relevant the circular threaded filters) and have acquired your filter holder and adapter ring so are ready to start thinking about the filters themselves. In this part I’ll be talking about Neutral Density (ND) filters..
Neutral Density Filters
Neutral density filters block light from entering the entire lens as opposed to ND Grads that block light across just part of the lens but more of that in part 3. To understand how and why ND filters are useful, you need to understand a bit about exposure. If up until now, you’ve been using your DSLR on automatic or semi-automatic, your camera has been making some or all of your exposure decisions for you. When you start to use filters, you’ll need to take your camera out of automatic mode and put it in manual and when you do, it’s going to be up to you, with the help of your camera’s built-in light meter, to set your aperture, shutter speed and ISO. This is the exposure trinity or as it’s sometimes called, the exposure triangle.

There really is nothing scary about this. It’s actually very simple, especially when it comes to landscape photography. Lets take care of one of the variables in the exposure trinity right away, ISO. For landscape work, which is where you’re going to be using your ND filters, your ISO will ideally be set to its minimum which is usually 100 although on some cameras the minimum may be 200. With ISO set, there are now only two remaining variables to worry about, aperture and shutter speed. To achieve a good depth of field, important as you want your landscape photographs to be sharp from front to back, you’ll need to set your aperture to between f/8 and f/16. I almost always set my aperture to f/11. That’s the second variable taken care of so now you just have to worry about shutter speed. When you look through your viewfinder with your camera set to manual you’re going to see something like this..
 To achieve optimal exposure, you’re going to have to turn your aperture and shutter speed command dials either clockwise or anti-clockwise to ensure there are no sticks showing in the negative or the positive ends of the light meter scale. We’ve already established that f/11 is desirable for a landscape shot so with the aperture to set to f/11, all you have to do is turn your shutter speed command dial to centre the meter. On a nice day, you’re probably going to end up with a shutter speed of something like 1/125 sec or maybe 1/250 if it’s bright and sunny. You’re now ready to take your landscape shot in manual mode.
It’s probably useful to note at this point that with your exposure meter balanced at optimal and keeping your ISO constant, if you open your aperture by turning you aperture command dial by one click, you’ll need to increase your shutter speed by one click to once again achieve optimal exposure. Similarly, if you reduce your aperture by one click, you’ll need to slow down your shutter speed by one click to once again achieve optimal exposure. That is all there is to setting your camera manually. Nothing scary there at all. Knowing that to freeze action, you need a fast shutter speed so therefore need a wider aperture and for a nice sharp landscape with good depth of field, you need smaller aperture and therefore a slower shutter speed and you’ve mastered manually setting your camera pretty much. Lots of experimentation is the key to getting to grips with these settings.
So, what happens if you now block some of that light entering the lens with an ND filter? The meter you see through your viewfinder is going to register a whole bunch of sticks on the negative side. To achieve optimal exposure now, you have the option to increase the aperture by reducing the f-number (that’s a bit confusing but you soon get used to the idea that the smaller the f-number, the larger the aperture and vice versa) or you can decrease your shutter speed and there’s your clue as to why putting a filter in front of your lens might be useful. Keeping the f-number constant at f/11, you’re going to have to reduce your shutter speed and when you start reducing your shutter speed, all sorts of interesting creative opportunities present themselves…
This is a shot of St Michael’s Mount in Cornwall taken without a filter…
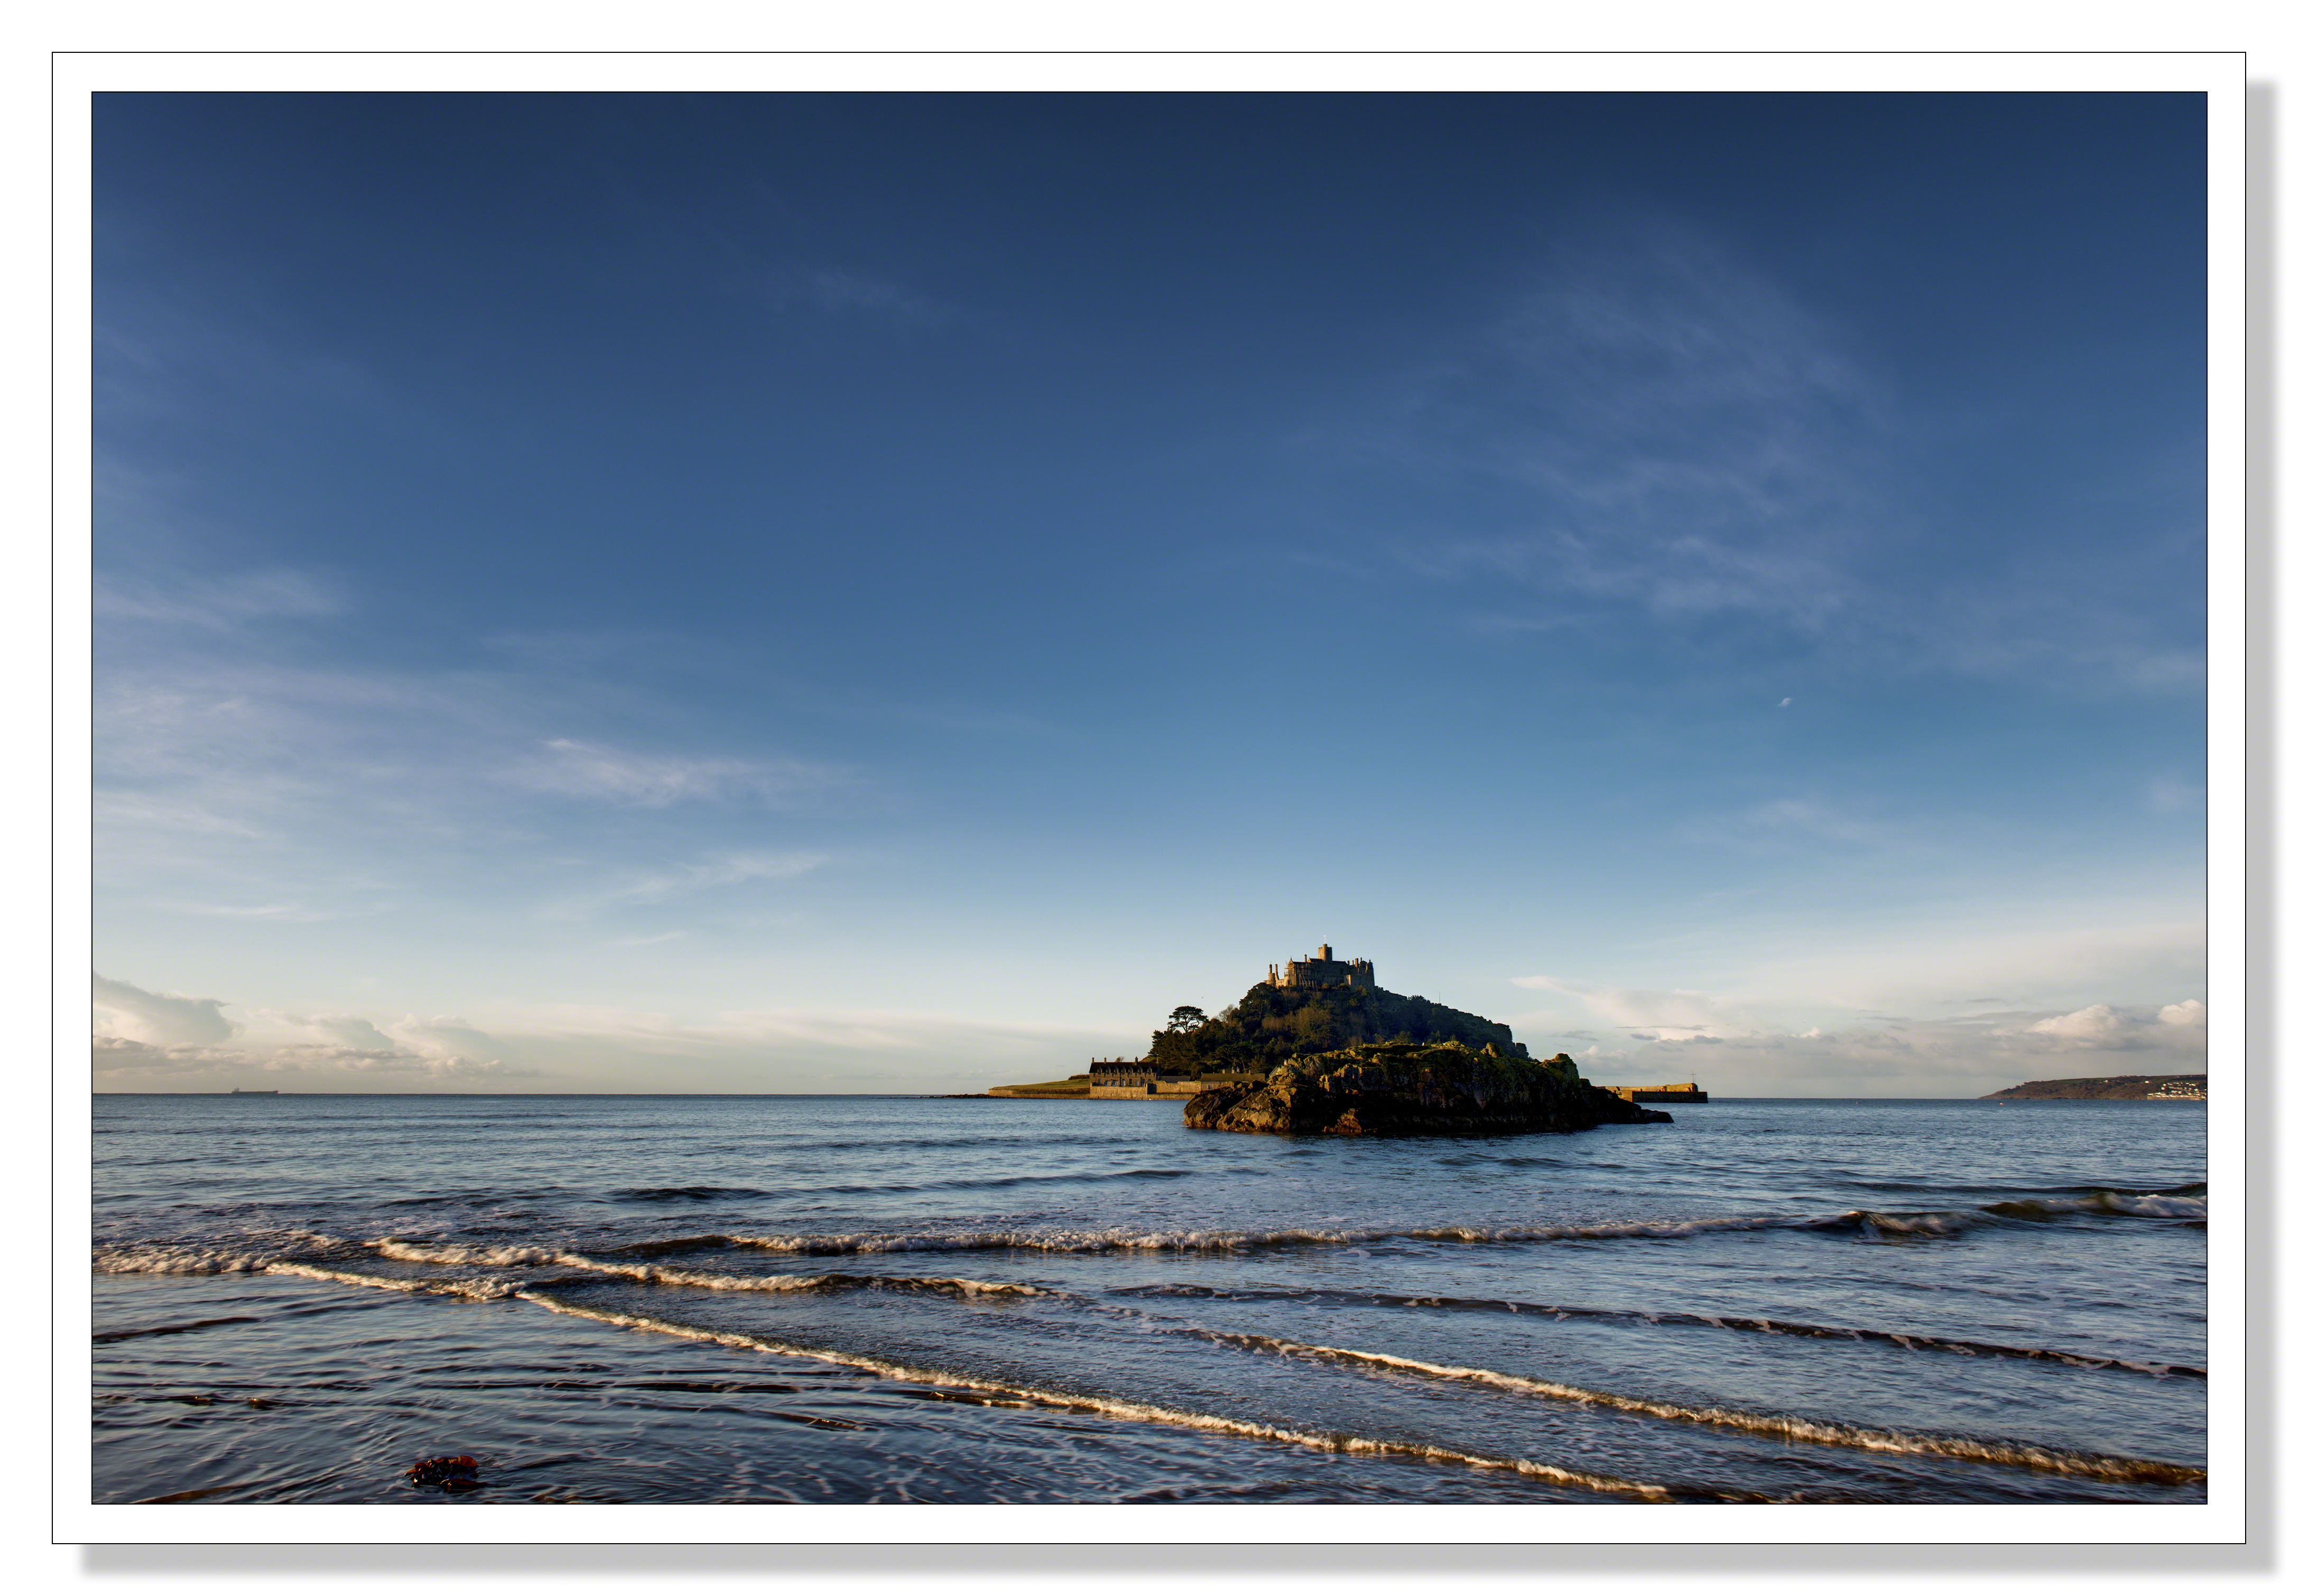
24mm f/11 1/13 sec ISO 100
This is the same shot with a neutral density filter attached..
 24mm f/11 180 sec. ISo-100
These two pictures were taken within minutes of each other. As you can see, both pictures were taken at f/11 with an ISO of 100. However, in the first shot the shutter speed was 1/13 second. In the second shot the shutter was open for a full three minutes. As a result, the sea has been turned a flat misty calm and movement in the clouds during the exposure has created a nice wispy effect.
Here the flow of a river is turned silky with the use of an ND filter…
 24mm f/11 180 sec. ISO-100
And here..
 24mm f/11 180 sec. ISO-100
I was able to extend the exposure time to three minutes in each of these pictures by using a 10 stop ND filter. ND filters and ND grads are categorised by the number of stops of light they restrict so what do people mean when they talk about stops? A stop is a step on the aperture scale or a click of your aperture command dial. Each of the aperture sizes in the diagram below represents a stop.
A lot of mathematics and physics goes into those f-numbers. Just take a look at the listing for f-number on Wikipedia and you’ll see what I mean. We don’t need to worry about all of that though. We just need to know that to achieve a correct exposure with a 2 stop ND filter you need to open the aperture by 2 steps or clicks of your aperture command dial. At f/11 this would mean stopping up to f/5.6. It is a little confusing as I’ve mentioned already that as the f-number decreases, the aperture increases but you soon get the hang of it. If we’re keeping our aperture constant at f/11 for landscape, rather than opening the aperture by two stops, we slow down the shutter speed to achieve the same optimal exposure.
Manufacturers of filters often don’t include the number of stops of light a particular filter will restrict. Instead they label them by filter factor. When you see a filter advertised it’s like to a .6 or a .9 for example. I’ve drawn up the diagram below to show how these numbers translate into stops.

A 10 stop ND filter allows you to slow the shutter speed significantly even in the brightest of conditions. The 10 stop ND filter I have (known as the Lee Big Stopper) comes with a handy exposure guide giving normal shutter speeds and then suggested shutter speeds with the filter in place given a constant aperture. So when you set up your shot you set your aperture and note the shutter speed according to the cameras light meter. You then slot the filter into place and use the handy guide to set the shutter speed. It’s important to note that to set shutter speeds of longer than 30 seconds, it’s necessary to set the shutter speed to ‘bulb’ on your camera and use a remote release.

A 10 stop ND filter is near impossible to see through. It cuts out a huge amount of light so to use the filter, it’s necessary to set up your shot before you attach the filter. Once you have the shot you want, composed, focused and you’ve noted the shutter speed, you slide the filter into place and set your remote to the desired exposure time. Before pressing ‘start’, you need to remember to close the little shutter on your viewfinder to prevent any light from entering the camera other than through the lens. Given the extended shutter speeds, a tripod is absolutely essential.
Being able to reduce shutter speed as I’ve discussed is where ND filters really come into their own creatively but the ability to increase the aperture with an ND filter can also come in handy if you want to take a shot with a very narrow depth of field but in bright sunlight. To achieve a nice blurred background or bokeh, you need a very wide aperture but in bright light, even with your fastest shutter speed, you may not be able to open the aperture sufficiently without overexposing your photo. By using an ND filter, you can open up the aperture beyond what would normally be possible to get the narrow depth of field you’re after and the photograph you want.

A particularly interesting aspect of using neutral density filters in my mind is that while the shutter is open on a long exposure, if people walk into you shot and don’t pause too long, their presence will not register on the sensor and so they won’t appear in your picture. Whilst I was taking the picture of St Michael’s Mount above, a man with his dog walked along the beach in front of my camera, the man paused, looked at me (clearly didn’t cross his mind that I was using my camera) and then carried on while the dog spent some time splashing around in the surf but no matter, there’s no sign of them in the picture.
This is a useful trick if you want to take a picture of a building or monument that is popular with tourists and you’d rather see the monument and not the tourists in your photograph. If you use a neutral density filter and set a long exposure, as long as the tourists keep moving, they will not appear in your picture. Photographers who specialise in architectural photography will often use ND filters specifically to make any people who wander into shot disappear.
In part 3, I will be taking a look at graduated neutral density filters (ND Grads).
Chillbrook


So informative and so well written
Great stuff! I’m going to print it and put it in my photography notes.
Thanks so much!
A very well written article, Adrian.
I have in trying to obtain one of these filters for ages without much success. They always seem to be awaiting back order. Do you happen to know of a reliable source thanking you in advance
Ps – great article!
This company always seem to be well stocked!
http://www.robertwhite.co.uk/filters.html?lens_filter_effect=314
Reblogged this on Steven Goodenbour Photography.
Thanks for sharing! Maybe someday I will be able to do this ! Create post, I saved it!
Thanks for sharing this information and wonderful photos!
beautiful pictures
Thanks a lot for your article. It is so well written and easily understandable. I am planning to purchase these filters in the future and your writing made it much more understandable what to look at while making a decision.